Installation
How to setup, install and run AppKickstarter.
Note
Please make sure you have completed all the prerequisites and setup all the services before proceeding.
Project Initialization
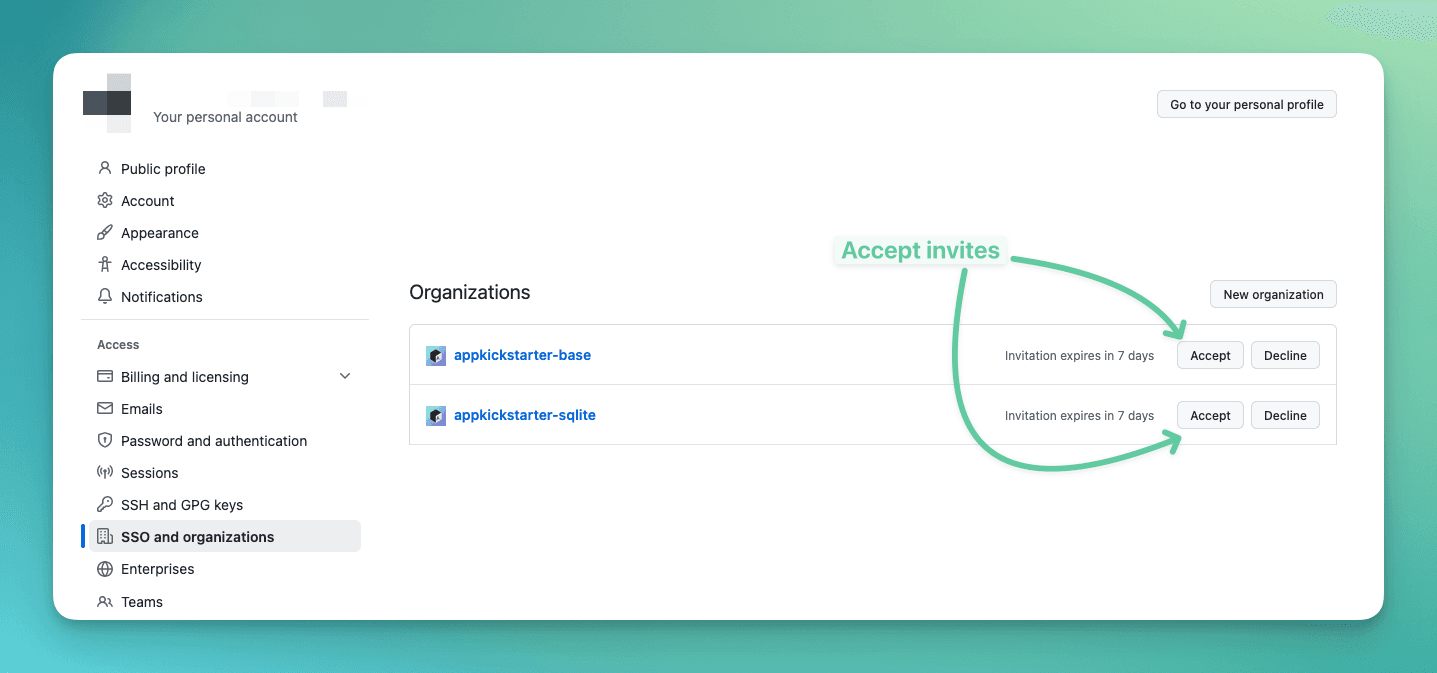
Accept the invites: After purchasing, you will have gotten invites to each of the repos:
appkickstarter-org/appkickstarter-base
0
appkickstarter-org/appkickstarter-sqlite
0
You can accept these invites from your email, via the links above, or by going to https://github.com/settings/organizations:
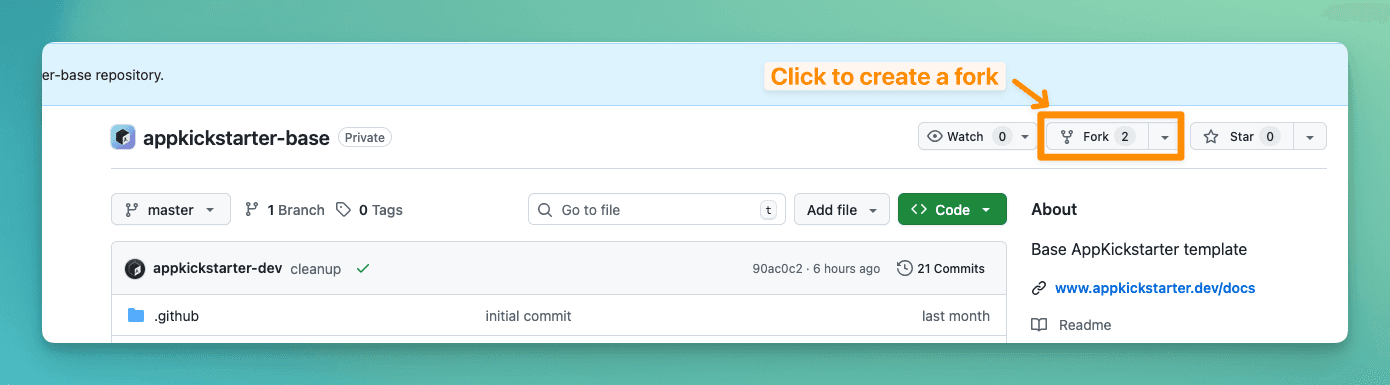
Fork the repo: Start your project by creating a fork of the repo:
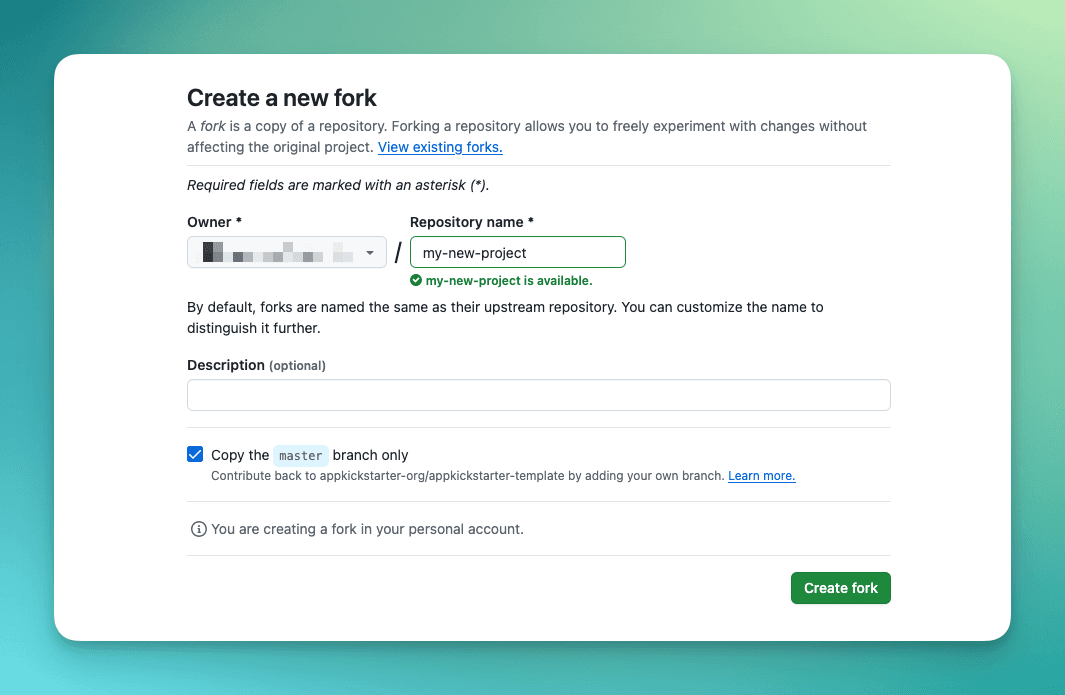
Name the fork: You likely want to call your project something different. When you fork the repo, you have the opportunity to choose a new name for your repo/project.
Clone your fork to your machine: It's time to create a copy of the git repo to your machine. Simply run git clone with the git URL:
git clone git@github.com:<YOUR-GITHUB-USERNAME>/<YOUR-PROJECT-NAME>.gitcd <YOUR-PROJECT-NAME>Setup upstream remote: We will make updates to the original repos. If you want to be able to pull these updates, add the original repos as upstream:
For example, if you pulled the SQLite flavor:
git remote add upstream https://github.com/appkickstarter-org/appkickstarter-sqlite.gitInstall dependencies
pnpm installRun our initialization script: we've setup a script to handle common customizations, such as your app name, org name, etc. It will prompt for that information and then install dependencies via pnpm install.
pnpm run initAt this point, you've successfully initialized the project. You technically can skip ahead and build & run the app, but we recommend setting the environment variables first to ensure everything is working right up-front.
Set Environment Variables
We leverage a number of services, as previously mentioned.
We have a script to quickly set everything up. It will prompt you for your keys, and then it will create a .env file with those values, and also update the application code, if needed:
pnpm run init:envBuild the App!
All the setup is now done and you are ready to build the app!
For development, we need to build a development client. The reason is because we use some native packages that aren't part of Expo Go, so we need to compile a custom build with everything we need.
Build Locally
You can build and runs your app on a simulator using:
cd apps/nativenpx expo run:iosnpx expo run:androidThis will run npx expo prebuild to generate native directories ios/ in your Expo app directory, install the dependencies, build the unsigned app, and open it on a Simulator.
If you want to run it on a physical device, you can pass the --devices flag with your physical device plugged:
npx expo run:ios --devicesnpx expo run:android --devicesYou will need to setup Code Signing Certificates in Xcode first. Follow the steps here.
Read more about local app compilation from Expo here: https://docs.expo.dev/guides/local-app-development/#local-app-compilation
Build via EAS
Soemtimes building the app locally doesn't work, and you run into various errors. You can leverage EAS to build your app for you instead.
All you have to do to create a development client is run the following commands:
To build for a simulator for the platform of your choice:
eas build -e simulator -p ioseas build -e simulator -p androidTo build for your physical device for development:
eas build -e development -p ioseas build -e development -p iosFrom there, it will upload your app bundle to EAS' servers, it will take care of the build, and then give you a QR code to scan to install the application!
You can also build locally via EAS by passing --local to the above commands.
If you are on Windows and want to build & test your iOS app, then building via EAS is the only solution.
You only need to re-build the development client (npx expo run:ios [--devices]) whenever you add new packages with native dependencies. These libraries will usually tell you the need to re-build.
Thus, if you want to just start the development server and connect to the existing development client on a Simulator/device, you can skip this step and just run cd apps/native && npx expo start instead! Or using Turborepo from the project root: pnpm dev, which will do the same thing (but you can run it from the repo root, and also run the web app).
More details below!
Run the App
If you build your app via npx expo run:{ios|android}, then it should have also started the Expo development server and opened in a Simulator or device! You can press i in the shell to install to a simulator or device.
Otherwise, if you built via EAS, then install the development client you just built to a Simulator/device, and then you can start up the Expo development server:
npx expo startYou should use the above command if you already have a development client installed and just want to start the development server.
Make note of the IP and port the development server is running on (for example: your IP might be 192.168.1.10 and using port 8081)
And then start up your development client by opening the app on the device/Simulator! Enter the details of your development server http://{IP}:{PORT} and your development client will download the JavaScript bundle and run!
Congrats! Your app is now up and running.
Time to learn about the codebase, and how to make this app yours.
Project Updates
You may notice that we forked the repo during the project initialization. This allows us to use the Git forking mechanism to deliver updates to you, so you can make changes in your repo independently, we can make improvements to the boilerplate, and our updates can be synced to you.
Changes will be made to the original repos, and if you setup the upstream remote as recommended above (e.g. git remote add upstream https://github.com/appkickstarter-org/appkickstarter-sqlite.git), you can pull in changes from the original repos by running:
# fetch the latest changes from upstream
git fetch upstream

# switch to the local master
git checkout master

# merge the upstream master into the local master
git merge upstream/master

# push to remote master to finalize
git push origin master
This is also taken care of within scripts/upstream-sync.sh. You can just run this periodically to pull the latest changes.